The holiday season is synonymous with warmth, joy, and, of course, delicious treats. While sugar cookies often steal the spotlight, there's a charmingly festive alternative that's just as delightful and incredibly easy to make: christmas tree brownies! These adorable, fudgy, and richly chocolatey creations are designed to look like mini Christmas trees, complete with green "frosting branches" and colorful "ornaments." They're a surefire hit at any holiday gathering, perfect for gifting, or simply enjoyed as a cozy treat by the fire.
Imagine a rich, chewy brownie, perfectly baked, then transformed into a tiny evergreen with a touch of vibrant green frosting and a sprinkle of festive cheer. It’s a treat that captures the magic of the holidays in every bite, pleasing both kids and adults with its irresistible taste and whimsical appearance. And the best part? You don't need to be a pastry chef to whip up a batch of these holiday showstoppers.
Why Christmas Tree Brownies Are Your New Holiday Favorite
Forget the intricate rolling and cutting of traditional sugar cookies. While beloved, they can be time-consuming. Christmas tree brownies offer a fantastic, less fuss, more fun alternative that still delivers on festive charm and incredible flavor. They stand out for several compelling reasons:
- Effortless Elegance: Starting with either a simple one-bowl scratch recipe or a convenient box mix, these brownies are incredibly straightforward to prepare. The decorating, while visually impressive, is surprisingly quick and intuitive.
- Irresistible Texture & Taste: Unlike some drier holiday cookies, these brownies boast that perfect balance of fudginess and chewiness, deeply infused with rich chocolate flavor. They’re satisfyingly dense without being heavy.
- Kid-Friendly Fun: The decorating process is where the real magic happens, and it’s an activity tailor-made for little hands. Kids will love turning plain brownie triangles into sparkling Christmas trees, making lasting holiday memories.
- Versatile Presentation: They look spectacular on a holiday cookie tray, make thoughtful homemade gifts, or serve as a unique dessert for a festive party. Their sturdy nature also makes them easy to transport.
In essence, these brownies offer all the joy of holiday baking with significantly less stress, allowing you to savor the season more fully.
Crafting the Perfect Brownie Base: From Scratch or Box Mix
The foundation of any great christmas tree brownie is, of course, a great brownie. Whether you prefer the control and satisfaction of a homemade recipe or the speed and convenience of a quality box mix, the goal is a rich, fudgy, and chewy chocolate square ready for its festive transformation. For a deeper dive into the pros and cons of each approach, check out our guide on Homemade or Box Mix: Delicious Fudgy Christmas Tree Brownies.
Essential Ingredients for a Scratch Brownie Masterpiece
Making brownies from scratch gives you full control over the flavor and texture. Here’s a look at the key ingredients and why they matter:
- Butter: Salted butter adds a subtle depth of flavor that complements the chocolate. If using unsalted, a slight increase in salt (around 1/2 teaspoon) will balance the sweetness.
- Sugars: A combination of granulated sugar and light brown sugar is often used. Brown sugar contributes to the moist, fudgy texture and adds a hint of molasses flavor that enhances the chocolate.
- Chocolate Chips: Bittersweet (around 60% cacao) or dark chocolate chips are ideal for a deep, rich chocolate flavor that isn't overly sweet. If you prefer a sweeter brownie, semisweet chocolate chips are a good alternative. The key is using high-quality chocolate for the best taste.
- All-Purpose Flour: Precision is crucial here. Too much flour can lead to dry, cakey brownies. Weighing your flour is the most accurate method. If you don't have a scale, lightly spoon flour into your measuring cup and level it off without compacting it. Sifting or stirring the flour before measuring can also help ensure proper aeration and measurement.
- Eggs & Vanilla: Eggs provide structure and moisture, while vanilla extract enhances the overall flavor profile, complementing the chocolate beautifully.
- Baking Soda & Salt: These are essential leavening and seasoning agents that contribute to the brownie's rise and balance the sweetness, bringing out the depth of the chocolate.
Step-by-Step Baking Guide for Flawless Brownies
Making these brownies from scratch is simpler than you might think, often requiring just one bowl (or saucepan) for the batter, minimizing cleanup.
- Prep Your Pan & Oven: Preheat your oven to 325°F (160°C). Line an 8x8-inch metal baking pan with parchment paper, leaving an overhang on two sides to create "handles" for easy removal.
- Melt & Combine: In a large saucepan, combine butter, sugars, and a touch of water. Bring the mixture to a gentle boil over medium heat, stirring regularly until the sugars are dissolved. This step helps create a glossy, fudgy texture.
- Infuse with Chocolate: Remove the pan from the heat. Immediately whisk in about 1 cup of your chocolate chips until they are fully melted and smoothly incorporated. The residual heat from the sugar mixture will do all the work!
- Add Wet Ingredients: Allow the mixture to cool slightly (to prevent scrambling the eggs). Whisk in the eggs and vanilla extract until everything is well combined and the mixture is smooth.
- Introduce Dry Ingredients: Gently fold in the flour, salt, and baking soda. The golden rule of brownie making: do not overmix! Mix just until no dry streaks of flour remain. Overmixing develops the gluten in the flour, leading to tough, cakey brownies instead of fudgy ones.
- Final Chocolate Swirl: Stir in the remaining 1/3 cup of chocolate chips. These will create delightful pockets of melted chocolate throughout your brownies.
- Bake to Perfection: Pour the batter into your prepared pan, smoothing the top. Bake for approximately 25-35 minutes, or until a toothpick inserted into the center comes out with moist crumbs attached – not wet batter, but not completely clean either. This indicates a fudgy center.
- Cool & Chill: This step is critical for clean cuts and easy handling. Let the brownies cool completely to room temperature in the pan. Then, chill them in the refrigerator for at least 1 hour (or even overnight). This firms them up beautifully.
Transforming Brownies into Festive Trees: The Decorating Fun
Once your brownies are perfectly baked and chilled, the true magic begins: transforming them into adorable Christmas trees! This is arguably the most enjoyable part of the process, especially for kids, and requires no special cookie cutters, just a steady hand and a bit of creativity. For more fantastic tips on involving little ones in the festive decoration, check out our guide: Quick Decorating: Christmas Tree Brownies Kids & Adults Adore.
Cutting Your Brownie Trees
After chilling, carefully lift the cooled brownie slab out of the pan using the parchment paper overhangs. Place it on a cutting board.
- First Cuts: Slice the large square brownie into three even strips.
- Triangle Power: Take each strip and cut it into triangles. Start by making a diagonal cut from one corner towards the center of the opposite side. Then, reverse the angle for the next cut, creating a zig-zag pattern along the strip. This method yields 4 large triangles per strip, totaling 12 impressive christmas tree brownies from an 8x8-inch pan. Don't worry about the smaller edge pieces – they make perfect "mini" trees or delicious chef's snacks!
Whipping Up Vibrant Green Frosting
A simple buttercream frosting is ideal for decorating, providing a smooth canvas for your festive designs.
- Cream the Butter: In a large bowl, beat softened butter on low speed for about 30 seconds until light and fluffy.
- Combine & Beat: Gradually add powdered sugar and a splash of heavy cream. Start on low speed to avoid a sugar cloud, then increase to medium-high and beat for 1-2 minutes until smooth and well incorporated. Add more cream if needed to reach your desired piping consistency.
- Color It Green: Mix in a few drops of green gel food coloring. Gel colors provide a more vibrant hue without thinning the frosting. Continue adding drops until you achieve your desired "Christmas tree" green.
- Prepare for Piping: Transfer the green frosting to a piping bag fitted with a small round tip (or a star tip for a textured look). If you don't have a piping bag, a Ziploc bag with a corner snipped off works just as well!
Creative Decorating Ideas
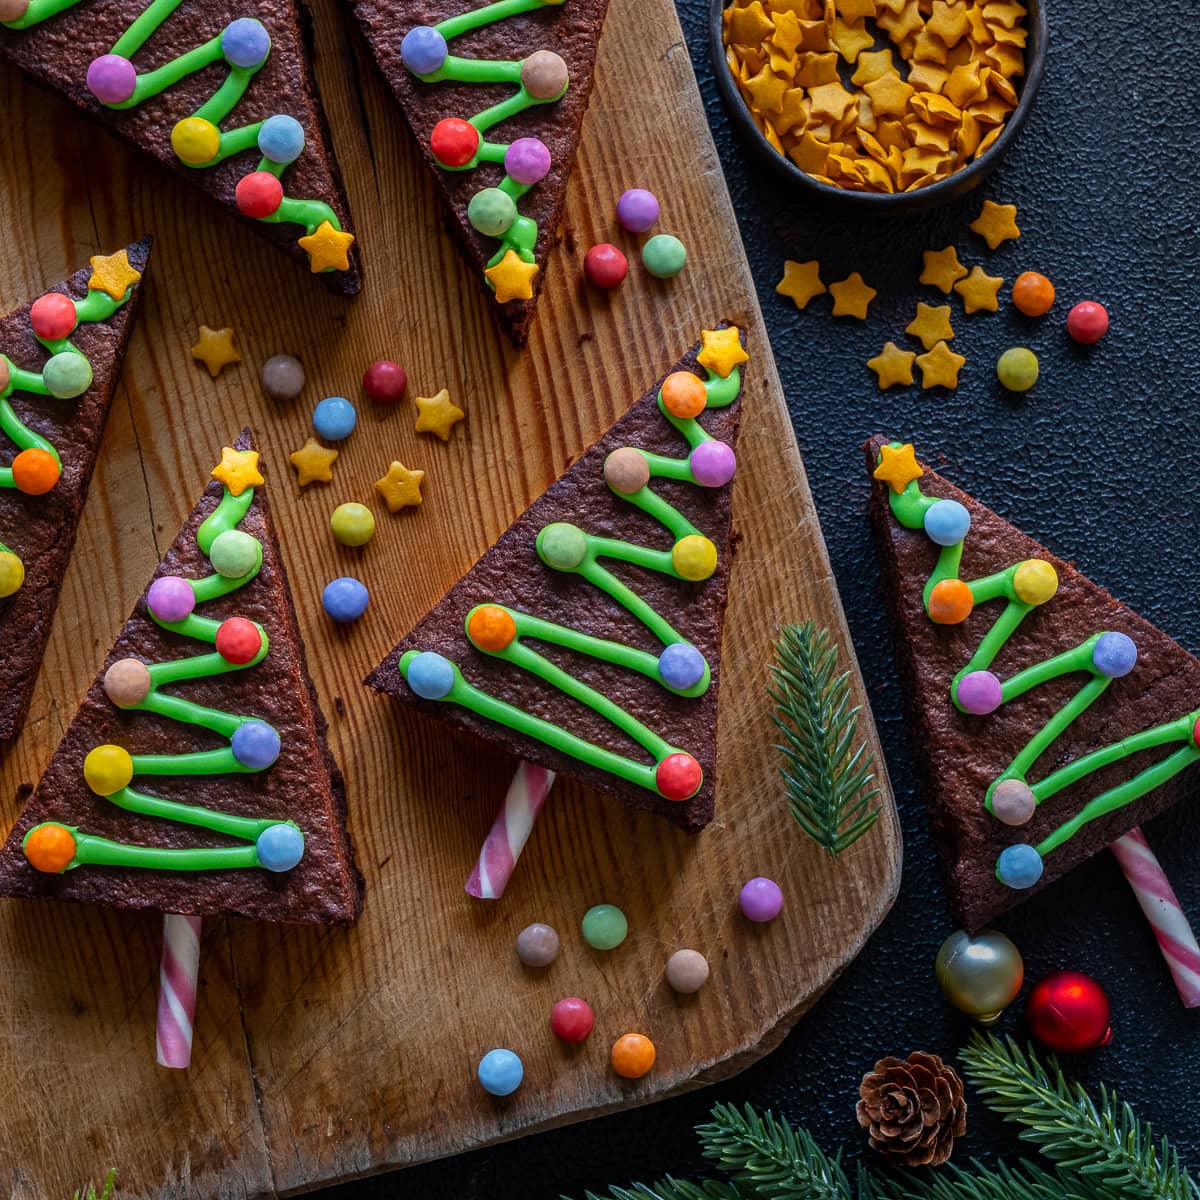
Now for the fun part! Pipe the green frosting onto each brownie triangle, starting from the top and working your way down in a zig-zag or swirl pattern, mimicking tree branches. Then, let your imagination run wild with edible decorations:
- Tree Trunks: Carefully insert a 1.5-inch piece of a candy cane (the sharper end first) into the base of each brownie triangle for a classic, minty "trunk." Alternatively, use pretzel sticks for a salty crunch, or even a small piece of a pirouette cookie.
- Festive Ornaments:
- Sprinkles: A classic choice! Use red, green, gold, or multi-colored sprinkles, nonpareils, or edible glitter for a dazzling effect.
- Mini Candies: Mini M&M's, small gumdrops, silver dragees, or even tiny chocolate chips can represent colorful ornaments.
- Star Toppers: Place a yellow star-shaped sprinkle or a small piece of star-shaped candy at the very top of each tree.
- Snow Dusting: After decorating, lightly dust the finished trees with powdered sugar for a whimsical "snowfall" effect.
Tips for Success and Making Them Shine
- Don't Rush the Cooling: The biggest mistake you can make is cutting warm brownies. They will crumble and be messy. Patience is key for those clean, sharp edges.
- Quality Ingredients Matter: Especially for the chocolate! Using good quality chocolate chips or chopped chocolate will significantly impact the final flavor.
- Prevent Sticking: Always line your pan with parchment paper. It makes removing the entire brownie slab a breeze, preventing any frustrating sticking.
- Decorate with Freshness: While the brownies can be baked ahead of time, decorating closer to when they'll be served ensures the frosting is fresh and the sprinkles are vibrant.
- Storage: Store decorated christmas tree brownies in an airtight container at room temperature for up to 3-4 days, or in the refrigerator for up to a week. If stacking, place parchment or wax paper between layers to prevent the frosting from sticking.
- Make it a Tradition: These brownies are not just a dessert; they're an activity. Gather the family, put on some holiday music, and make decorating a cherished annual tradition.
Whether you're looking for a delightful addition to your holiday dessert table, a charming homemade gift, or a fun activity to share with loved ones, christmas tree brownies tick all the boxes. They're easy, delicious, and undeniably festive. So, this holiday season, skip the stress and embrace the sweet simplicity of these chocolatey evergreens. Your taste buds, and your family, will thank you!
